• About Us
  • Collegian Digital Archive
  • Publication dates
  • About Us
  • Collegian Digital Archive
  • Publication dates
Home/Knowledge Base/Photoshop Tutorials/Batch photo sizing for galleries

Batch photo sizing for galleries

74 views 0

    1. Collect all images together for a gallery inside a folder
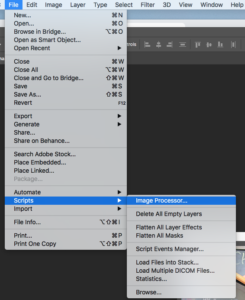
    2. Navigate to File>Scripts>Image Processor

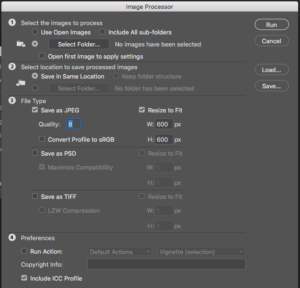
  1. In Step 1, navigate to the folder where your images are (Should be in that issue’s folder for photos)
  2. In Step 2, keep the button for “Save In Same Location” selected
  3. In Step 3, select “Save as JPEG” with quality of 8 and “Resize to Fit” with the dimensions of 600 px by 600 px
  4. That WILL NOT make the image square, instead it sets parameters to the max width and height of the image
  5. Click “Run”
  6. The images will process in the background of Photoshop
  7. Once complete, a new “JPEG” folder will be in the original folder
  8. Those are your images for the photo gallery

Was this helpful?

Yes  No
Related Articles
  • Staying logged in to Adobe Creative Cloud
  • Resizing photos
  • Cropping photos
  • Dodging and burning photos
  • Adding eCollegian to website
  • News judgement decision making

No luck finding what you need? Contact Us

Campus Media

Most Visited
  • Link to Pulse 209
  • Social media for Pulse of 209
  • Building a photo gallery with Royal Slider
  • Basic Photoshop editing
  • Using Cheqroom for equipment requests
  • Basic audio editing
  • Tutorials, documents and helpful links
  • Getting to know the Canon Vixia Video Camera
  • Data Retention
  • Page Design Video Tutorial

  News judgement decision making

Adding eCollegian to website  

© The Collegian 2010-2024